Kiyome User Manual
Complete guide to AI-assisted de-mudding — cleaner mixes, one knob at a time.
Version 1.0.7
1. Introduction
What is Kiyome?
Kiyome (清め) is an AI-assisted de-mudding plugin that detects and removes muddy frequency buildup in the critical 60–900 Hz range. Using spectral pattern recognition powered by an embedded ONNX neural network, Kiyome intelligently identifies problematic low-mid energy and surgically reduces it — preserving warmth, body, and musicality.
AI-powered clarity meets one-knob simplicity. Select your instrument, turn the Depth knob, and let the neural network handle the rest. Or dive deeper with 5-band parametric control, M/S processing, and three analog color circuits for character and warmth.
Key Features
-
✓
One-Knob Operation (Depth)
A single master control scales all processing — from subtle cleanup to aggressive de-mudding. Perfect for fast workflows.
-
✓
13 Instrument-Specific AI Models
Dedicated neural network models for Male Vocal, Female Vocal, Kick, Snare, Toms, Overheads, Electric Bass, Synth Bass, Acoustic Guitar, Electric Guitar, Keys, Strings/Brass, and Full Mix.
-
✓
Learn Mode
Analyzes your audio's spectral profile in 5 seconds and automatically adjusts per-band sensitivity for optimal de-mudding.
-
✓
5-Band Parametric EQ (60–900 Hz)
Five precisely tuned bands targeting Sub-Mud (100 Hz), Low-Mud (200 Hz), Core-Mud (350 Hz), Upper-Mud (500 Hz), and Mud-Warmth (700 Hz).
-
✓
M/S Processing
Process mid and side channels independently for surgical stereo-field de-mudding without collapsing the mix.
-
✓
Analog Color (Neve / API / Studer)
Three independent analog character circuits — Warm (Neve 1073), Punch (API 2520), and Tape (Studer A800) — to add life back after de-mudding.
-
✓
38 Factory Presets
Professionally crafted presets across 10 categories covering vocals, drums, bass, guitar, keys, strings, mix bus, genre-specific, creative, and analog color starting points.
-
✓
Real-Time Spectral Visualization
See exactly where mud lives in your audio with a live spectrum display (60–1000 Hz), draggable band nodes, and a gain reduction curve overlay.
Who Is It For?
Whether you are a mixing engineer dealing with boxy vocals and cloudy guitars, a producer trying to get a clean low-mid balance, a podcaster fighting room resonance, or a content creator who wants clearer audio without spending hours with an EQ — Kiyome gives you AI-powered clarity in seconds.
2. System Requirements
macOS
- OS Version: macOS 13 (Ventura) or later
- Processor: Apple Silicon (M1/M2/M3/M4) & Intel (Universal Binary)
- Plugin Formats: AU (Audio Unit) + VST3 + AAX
- Standalone: Standalone application included
- DAW Compatibility: Any DAW supporting AU, VST3, or AAX (Logic Pro, Ableton Live, FL Studio, Reaper, Cubase, Studio One, GarageBand, Pro Tools, etc.)
Windows
- OS Version: Windows 10 or later
- Processor: 64-bit (x86_64)
- Plugin Formats: VST3 + AAX
- DAW Compatibility: Any DAW supporting VST3 or AAX (Ableton Live, FL Studio, Reaper, Cubase, Studio One, Pro Tools, etc.)
Note: The embedded ONNX neural network runs on CPU — no GPU required.
3. Installation Guide
macOS
- 1. Download the Kiyome installer (.pkg) from sugoiaudio.com.
- 2. Double-click the .pkg file and follow the on-screen instructions.
- 3. The plugin will automatically install to the correct locations.
- 4. Open your DAW and rescan plugins if needed. The plugin appears as “Kiyome” by “Sugoi.”
- 5. Your 30-day free trial starts automatically — full functionality, no limitations.
Installation Paths:
AU: ~/Library/Audio/Plug-Ins/Components/Kiyome.component
VST3: ~/Library/Audio/Plug-Ins/VST3/Kiyome.vst3
AAX: /Library/Application Support/Avid/Audio/Plug-Ins/Kiyome.aaxplugin
Windows
- 1. Download the Kiyome installer (.exe) from sugoiaudio.com.
- 2. Run the .exe and follow the installation wizard. Administrator privileges may be required.
- 3. The plugin will automatically install to the standard VST3 and AAX locations.
- 4. Open your DAW and rescan plugins if needed. The plugin appears as “Kiyome” by “Sugoi.”
- 5. Your 30-day free trial starts automatically — full functionality, no limitations.
Installation Paths:
VST3: C:\Program Files\Common Files\VST3\Kiyome.vst3
AAX: C:\Program Files\Common Files\Avid\Audio\Plug-Ins\Kiyome.aaxplugin
Tip: If the plugin does not appear in your DAW after installation, try rescanning your plugin folder. In Logic Pro, this happens automatically on launch. In Ableton Live, go to Preferences > Plug-ins > Rescan. In Cubase, click the “Update” button in VST Plug-in Manager.
4. Interface Overview
Kiyome features a clean, focused interface designed for fast de-mudding workflows. The layout is organized into distinct zones: toolbar, spectrum display, knob panel, secondary controls, status bar, and an expandable advanced panel.
Toolbar

The top bar contains the following controls from left to right:
- Brand Logo: Sugoi Audio branding.
- Live Mode: Toggles zero-latency monitoring. Off (the default, Nature) is the full-quality, linear-phase engine with about 1 ms of reported latency (48 samples) your DAW compensates automatically — best for mixing. On (Live) switches to a zero-latency engine for tracking and real-time monitoring, where any delay is distracting.
- Preset Navigation: Previous/next arrows with a dropdown menu for browsing and loading presets.
- Undo / Redo: Step backward or forward through your parameter change history.
- A/B Compare + Copy: Toggle between two parameter snapshots (A and B). Copy syncs both slots to the current settings.
- Bypass: Bypass the entire plugin processing.
- Info (How to Use): Opens a quick-start guide overlay.
- Settings: Access licensing, activation, and advanced options.
Spectrum Display
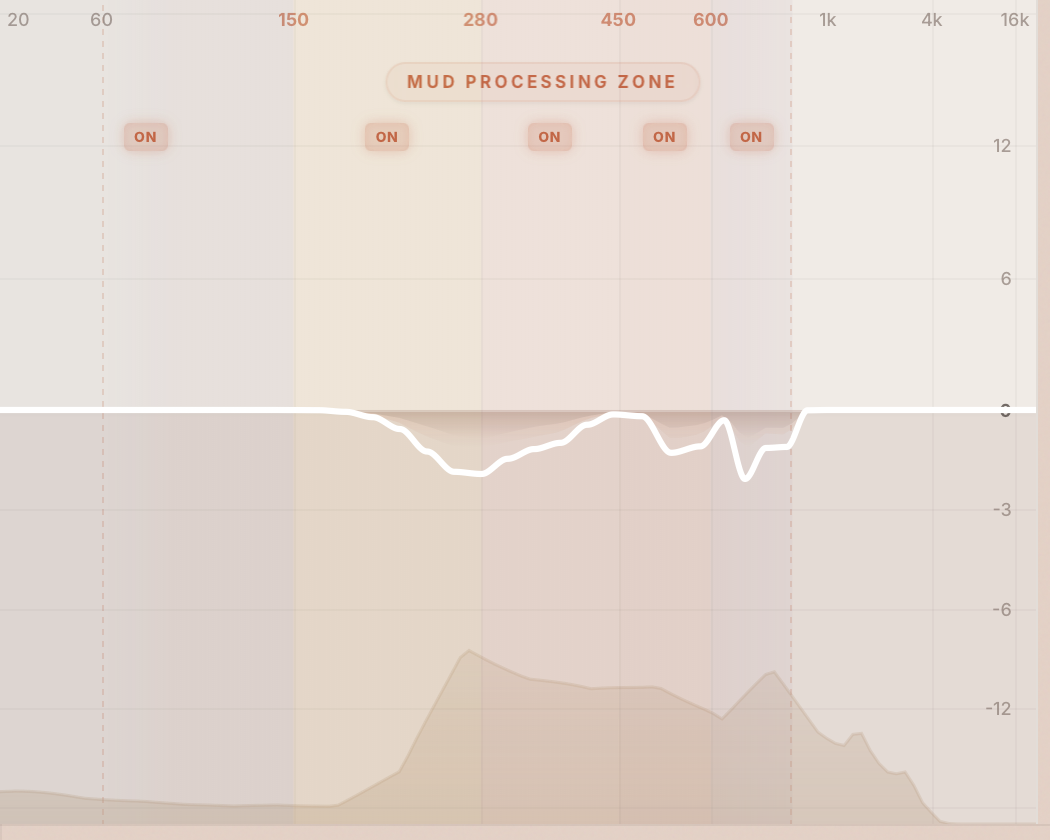
The large display area shows a real-time spectral visualization of the 60–1000 Hz range:
- 5 Draggable Band Nodes: Each node represents one of the five de-mudding bands. Click a node to select that band; drag vertically to adjust its sensitivity.
- Gain Reduction Curve: A real-time curve (in dB) showing how much reduction is being applied at each frequency.
- Input Magnitude Overlay: Shows the incoming signal's spectral energy distribution so you can see where mud accumulates.
- Right-Click: Right-click any band node to bypass that individual band.
Knob Panel
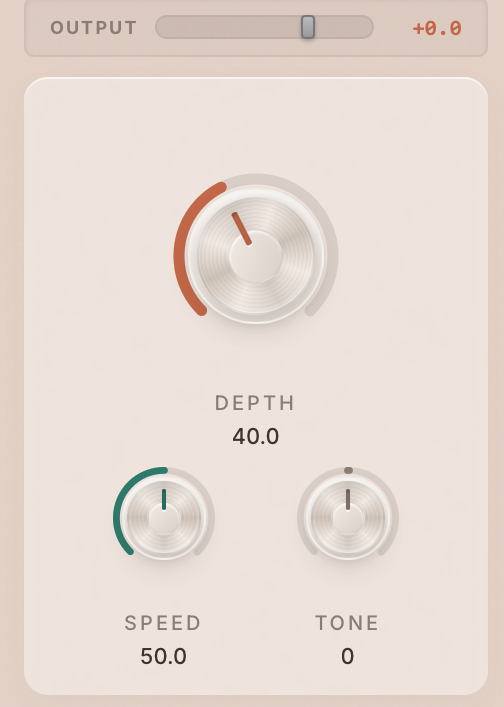
Three rotary knobs arranged across the center of the interface:
110px, terracotta. Master processing strength (0–100%).
68px, teal. Reaction time (0–100%).
68px, grey-brown. Tilt shelf at 1 kHz (0–100%).
All knobs respond to vertical drag: up to increase, down to decrease. Hold Shift for fine adjustment. Double-click to reset to default.
Secondary Controls

- Instrument Selector: A dropdown menu with 13 AI models. Select the instrument type that matches your source material for optimal de-mudding behavior.
- Learn Button: Initiates a 5-second spectral analysis of your audio. After learning, per-band sensitivities are automatically adjusted. See Section 6: Learn Mode for details.
Status Bar

A horizontal control strip below the knob panel:
- Low Cut Slider: High-pass filter from 20–200 Hz with a slope selector (6, 12, 18, or 24 dB/oct).
- Delta Listen: Toggle to hear only the frequencies being removed — invaluable for verifying you are cutting mud, not body.
- Auto Gain: Toggle automatic output level compensation to match the perceived loudness of the bypassed signal.
- Advanced Panel Toggle: Opens/closes the Advanced panel. An orange dot indicator appears when any Analog Color parameter is active, even when the panel is closed.
Advanced Panel (Expandable)

Revealed by clicking the Advanced toggle. Contains three independent analog character sliders:
Neve 1073 character (0–100%)
API 2520 character (0–100%)
Studer A800 character (0–100%)
See Section 9: Analog Color for full descriptions of each circuit.
Footer Area
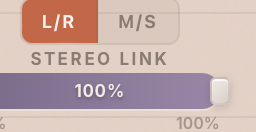
- Processing Mode Selector: Switch between L/R (standard stereo) and M/S (Mid/Side) processing.
- Stereo Link Slider (L/R mode): Controls how linked the left and right channels are (0% = dual mono, 100% = fully linked).
- M/S Balance Slider (M/S mode): Controls the balance of de-mudding depth between the mid and side channels.
5. Core Parameters Reference
| Parameter | Range | Default | Description |
|---|---|---|---|
| Depth | 0 – 100% | 40% | Master processing strength. Scales all band gain reductions proportionally. 0% = no processing, 100% = maximum de-mudding. |
| Speed | 0 – 100% | 50% | Reaction time of the spectral detection. 0% = 200 ms smooth (slow, gentle), 100% = 10 ms (fast, reactive). Lower values are more transparent; higher values catch transient mud. |
| Tone | 0 – 100% | 50% | Post-ML tilt shelf at 1 kHz pivot. 0% = darker (low boost / high cut, ≈ +4 dB / −4 dB), 50% = neutral (true bypass), 100% = brighter (low cut / high boost). Applied after the AI de-mudding stage so it never affects the cut shape itself. |
| Output | -12 to +6 dB | 0 dB | Post-processing level trim. Use to match the output level to the bypassed signal. |
| Instrument | 13 models (default: Full Mix) | Selects the AI model optimized for the source material. Each model has different spectral sensitivity profiles. | |
Available Instrument Models
Parameter Interaction Notes
Depth + Instrument
The AI model determines which frequencies are targeted; Depth controls how aggressively they are reduced. Changing the instrument model can dramatically change the result even at the same Depth setting.
Speed + Tone
Speed controls how quickly the AI reacts to spectral changes. Tone is a separate tilt shelf at 1 kHz applied after the AI de-mudding stage — turn left for darker, right for brighter, leave at centre for a true bypass. Speed shapes time; Tone shapes overall tonal balance.
Auto Gain
Compensates for level changes caused by de-mudding. Disable Auto Gain when level-matching by ear, or when the plugin is followed by a compressor that reacts to level changes.
Delta Listen
When enabled, you hear only the frequencies being removed by the AI de-mudding stage. Tone tilt is bypassed in Delta listen so you can audition the pure ML residual without colouration. If you hear musical content (not just muddiness), reduce the Depth or adjust band sensitivities to preserve it.
6. Learn Mode
What It Does
Learn mode analyzes the spectral energy distribution of your audio and automatically adjusts each band's sensitivity to match the material. Bands where mud is concentrated get higher sensitivity; bands where the signal is clean get lower sensitivity. This ensures Kiyome focuses its processing where it matters most.
How to Use
- 1. Play your audio through the plugin (ensure signal is audible, not silence).
- 2. Press the LEARN button. A 5-second countdown begins.
- 3. Keep the audio playing during the countdown (5s → 4s → 3s → 2s → 1s).
- 4. Learning stops automatically after 5 seconds. Band sensitivities are updated immediately.
Early Stop
You can stop the learning process early by clicking the button again during the countdown. Whatever has been analyzed so far will be used.
Clear Profile
Double-click the LEARNED button (green state) to clear the learned profile and reset all band sensitivities to their defaults.
Button States
| State | Appearance | Meaning |
|---|---|---|
| LEARN | Default / idle | No profile active. Click to start learning. |
| 5s / 4s / 3s / 2s / 1s | Countdown display | Actively analyzing audio. Click to stop early. |
| LEARNED | Green indicator | Profile is active. Band sensitivities have been adjusted. Double-click to clear. |
Tip: The learned profile is saved with your presets. When you save a preset after learning, the profile is stored so you can recall it later without re-learning.
7. Band Controls
Kiyome uses five precisely tuned bands to target the most common muddy frequency regions. Each band can be individually adjusted for sensitivity and bypassed independently.
| Band | Frequency | Character |
|---|---|---|
| Sub-Mud | 100 Hz | Deep rumble and sub-bass mud. Common in kick drums, bass, and room resonance. |
| Low-Mud | 200 Hz | Classic “boominess.” Proximity effect in vocals, acoustic guitar body resonance. |
| Core-Mud | 350 Hz | The “boxy” zone. Cardboard-like resonance in vocals, snare, and room recordings. |
| Upper-Mud | 500 Hz | Honky, nasal quality. Common in electric guitar, toms, and cheaper microphones. |
| Mud-Warmth | 700 Hz | Borderline between mud and warmth. Handle with care — too much reduction here can thin the sound. |
Per-Band Sensitivity
Each band has an adjustable sensitivity ranging from 1.0x to 4.0x. Higher sensitivity means the band reacts more aggressively to detected mud. Adjust sensitivity by dragging the band nodes vertically on the spectrum display.
Per-Band Bypass
Each band has a small power icon button located on the spectrum display, just below the "Mud Processing Zone" label. These buttons let you bypass individual bands:
- Green glow — Band is active (processing normally)
- Gray / dim — Band is bypassed (audio passes through unprocessed)
Click a power icon to toggle its bypass state. This is useful when you want to keep mud removal on most bands but preserve a specific frequency range — for example, bypassing the Sub-Mud (100 Hz) band to retain kick sub-bass, or the Mud-Warmth (700 Hz) band to preserve vocal body.
Transient-Aware Processing
Kiyome automatically detects transient attacks (kicks, snares, pick strokes, hammer hits) and temporarily reduces the EQ cut depth during those moments. This preserves punch and attack clarity while still removing mud from the sustained portions of the signal.
- Always on — no button or setting needed. It works automatically with any Depth value.
- Zero lookahead — the transient detector runs in parallel with the audio path and adds no latency beyond the engine's 48-sample baseline (≈ 1 ms @ 48 kHz).
- Per-band scaling — low-frequency bands (where kick and bass transients live) receive more protection than upper bands.
- Works with Make Room — sidechain ducking is not affected by transient protection. Only the AI de-mudding portion is modulated.
The practical result: you can push the Depth knob higher without worrying about losing punch. The same setting that previously softened your drums now cleans the mud while keeping the attack intact.
Tip: If you find the plugin is removing too much body from a vocal, try bypassing the Mud-Warmth (700 Hz) band or reducing its sensitivity to 1.0x. This preserves the natural warmth while still cleaning the lower mud bands.
8. Processing Modes
L/R (Stereo)
Standard left/right stereo processing. Both channels are processed with the same de-mudding settings.
- Stereo Link: 0% — Dual mono. Each channel is analyzed and processed independently. Maximum stereo separation.
- Stereo Link: 100% — Fully linked. Both channels share the same detection signal, ensuring identical processing. Best for preserving stereo image.
- Stereo Link: 50% (default) — A balanced compromise. Good for most material.
M/S (Mid/Side)
Mid/Side processing mode. The signal is decoded into mid (center) and side (stereo difference) components, each processed independently.
- M/S Balance Slider: Controls the balance of de-mudding depth between mid and side. Center = equal processing. Move left to focus on mid; move right to focus on side.
- Dual-Color Spectrum: In M/S mode, the spectrum display shows two overlaid traces — terracotta for the mid channel and purple for the side channel.
Pro tip: M/S mode is excellent for mix bus de-mudding. Process the mid channel more aggressively (where mud accumulates from centered instruments like bass and kick) while leaving the side channel cleaner to preserve stereo width and ambiance.
Low Cut (High-Pass Filter)
Frequency Range: 20 – 200 Hz
Slope Options: 6 dB/oct, 12 dB/oct, 18 dB/oct, 24 dB/oct
A high-pass filter applied before the de-mudding processing. Use it to remove sub-bass rumble and infrasonic content that can interfere with the AI's spectral analysis. For most material, 30–60 Hz at 12 dB/oct is a safe starting point.
9. Analog Color
De-mudding can sometimes leave audio feeling thin or clinical. The Analog Color section adds warmth, character, and harmonic richness back into the signal. All three circuits are independent and can be combined freely. An orange dot appears on the Advanced toggle when any color is active, even when the panel is closed.
Warm — Neve 1073
Range: 0 – 100% | Default: 0%
Odd-harmonic dominant saturation with subtle even harmonics and a warm low-pass filter centered around 300 Hz. Inspired by the legendary Neve 1073 preamp, this circuit adds a gentle, musical warmth that fills out the low-mids naturally.
Best For
- • Vocals that sound thin after de-mudding
- • Acoustic instruments that need body
- • Adding richness without obvious distortion
Punch — API 2520
Range: 0 – 100% | Default: 0%
Cleaner and tighter than Warm. Features dual-envelope transient shaping with mild harmonic drive. Inspired by the API 2520 op-amp, this circuit adds punch and definition without the thickness of tube-style coloration.
Best For
- • Drums and percussive material
- • Electric bass that needs definition
- • Adding transient snap and energy
Tape — Studer A800
Range: 0 – 100% | Default: 0%
Deep saturation with a natural high-frequency rolloff at 16 kHz. Inspired by the Studer A800 tape machine, this circuit adds vintage character, gentle compression, and a cohesive “glue” that makes everything sound like it belongs together.
Best For
- • Mix bus processing for vintage character
- • Taming harsh digital recordings
- • Full mixes that need cohesion and depth
Tip: The three color circuits can be combined. A popular starting point is Warm at 30% + Tape at 20% for vocals — this replaces the body lost from de-mudding with a musical, analog-flavored warmth.
10. Make Room For
What It Does
Make Room For is an intelligent sidechain ducking feature that helps two tracks coexist in a mix. When you route another track (e.g., a vocal) into Kiyome's sidechain input, Kiyome will automatically reduce gain in frequency bands where the sidechain source is most prominent — making spectral room for it to cut through.
Unlike conventional sidechain tools that blindly duck across the entire spectrum, Kiyome's AI model acts as a guard — it only applies deeper cuts in bands it already identifies as muddy or problematic. Healthy frequency bands are protected, with a maximum sidechain-only cut of −6 dB. This means your track retains its body and warmth while still making room for the sidechain source.
How to Use
Insert Kiyome on the track you want to duck
For example, insert Kiyome on a guitar track that's competing with vocals.
Route the competing track to Kiyome's sidechain input
In your DAW, set the sidechain source to the track you want to make room for (e.g., the vocal track).
DAW-specific instructions
- Logic Pro: Click the Side Chain dropdown at the top-right of the plugin window and select the source track.
- Ableton Live: Expand the plugin in the device chain, then set the Sidechain > Audio From dropdown to the source track.
- Cubase / Nuendo: Click the Side-Chain Activate button on the plugin, then route the source via the Routing tab.
- Pro Tools: Select the source track from the Key Input selector at the top of the plugin window.
Click Make Room For in the bottom bar
The button will turn blue when active. If no sidechain is routed, a hint message will appear in the spectrum area.
Adjust Depth to taste
The main Depth knob controls the overall amount of de-mudding. Higher values will also increase the Make Room effect in bands that the AI identifies as muddy.
Watch the blue fill in the spectrum display
A blue semi-transparent fill shows the additional gain reduction caused by Make Room, layered on top of the orange AI curve. This lets you see exactly how much extra ducking is happening and in which bands.
How It Works Under the Hood
Kiyome analyzes the sidechain signal with a real-time FFT and extracts energy across 5 frequency bands (60–850 Hz). This energy map is combined with the AI model's muddy-frequency detection on the main signal:
- AI says muddy + SC energy high → deeper cut (AI-boosted ducking)
- AI says muddy + SC energy low → normal AI cut only
- AI says clean + SC energy high → gentle cut, max −6 dB (protects healthy bands)
- AI says clean + SC energy low → no cut
Auto Gain Behavior
When Make Room is active, Auto Gain only compensates for the AI de-mudding portion of the gain reduction — it does not compensate for the sidechain ducking. This is by design: the whole point of Make Room is to reduce volume in competing frequency bands, and auto-compensating would undo that.
Make Room Presets
Kiyome includes 4 factory presets designed for common Make Room scenarios:
| Preset | Instrument Model | Use Case |
|---|---|---|
| MR Vocal Space | Electric Guitar | Guitar making room for vocals |
| MR Kick and Bass | Electric Bass | Bass making room for kick drum |
| MR Keys Unmasking | Keys | Keys/piano making room for vocals |
| MR Full Unmasking | Full Mix | General-purpose spectral ducking |
Tip: Make Room works best when you select the correct instrument model for the track Kiyome is inserted on. For example, if Kiyome is on a guitar track, choose "Electric Guitar" — this ensures the AI accurately identifies which frequencies are muddy vs. healthy.
11. Factory Presets
Kiyome ships with 38 factory presets organized into 10 categories. Each preset configures the instrument model, Depth, Speed, Tone, band sensitivities, and Analog Color settings for common use cases.
| Category | Presets | Examples |
|---|---|---|
| Vocals | 5 | Male vocal clarity, female vocal cleanup, podcast de-mud, vocal bus, narration |
| Drums | 4 | Kick tightener, snare clarity, toms cleanup, overhead de-mud |
| Bass | 3 | Electric bass focus, synth bass cleanup, upright bass clarity |
| Guitar | 2 | Acoustic guitar de-box, electric guitar tighten |
| Keys & Synth | 4 | Piano clarity, Rhodes warmth, synth pad cleanup, organ de-mud |
| Strings & Orchestral | 3 | String ensemble, brass section, orchestral bus |
| Mix Bus | 4 | Gentle mix cleanup, mastering touch, aggressive de-mud, M/S clarity |
| Genre | 6 | Pop mix, rock mix, hip-hop, EDM, jazz, acoustic/folk |
| Creative | 3 | Extreme scoop, lo-fi thinning, telephone effect |
| Color | 4 | Neve warmth, API punch, Studer tape, all-color blend |
Preset Management
- Save As: Save your current settings as a new user preset.
- Delete: Remove a user preset (factory presets cannot be deleted).
- Export: Export a preset to a file for sharing or backup.
- Import: Import a preset file from disk.
A/B Compare
Toggle between two independent parameter snapshots (A and B) using the A/B button in the toolbar. Use Copy to sync both slots to the current settings — then tweak one slot to quickly compare variations.
Undo / Redo
Full parameter change history. Every knob turn, button click, and preset load is recorded. Use the Undo and Redo buttons in the toolbar to step through your changes.
12. Trial & Licensing
30-Day Free Trial
- Full functionality during the trial period — no feature limitations.
- All 13 AI models, all 38 presets, all parameters, all Analog Color circuits.
- Trial starts automatically on first launch.
- When the trial expires, audio output is muted. Purchase a license to continue using the plugin.
Purchasing a License
Visit the official website to purchase a license key. Payment is processed securely through Lemon Squeezy.
Buy NowOnline Activation
- 1. Open Kiyome and click the Settings icon in the toolbar.
- 2. Paste your license key in the activation field.
- 3. Click “Activate” to complete the activation.
Offline Activation
If your studio computer does not have internet access:
- 1. Open Settings and note your Machine ID.
- 2. On a device with internet, visit the offline activation page on sugoiaudio.com.
- 3. Enter your license key and Machine ID to generate an offline token.
- 4. Enter the offline token in the plugin's Settings to activate.
One license per user, tied to your machine.
13. FAQ
What is “mud”? +
Mud refers to excessive low-mid frequency buildup in the 60–900 Hz range. It makes mixes sound boxy, cloudy, and congested — as if you are listening through a cardboard box. Mud is caused by room resonance, proximity effect, overlapping instruments in the same frequency range, or poor microphone placement.
Does Kiyome add latency? +
Yes — about 1 ms (48 samples at 48 kHz). Since v1.0.5, Kiyome uses a linear-phase FIR processing engine for cleaner, more transparent de-mudding with perfectly preserved phase. The AI neural network runs in a background thread and does not add to that latency. That 1 ms applies to the default Nature engine and is fine for mixing and mastering. If you need zero latency — for vocal tracking through headphones or any real-time monitoring — turn on Live mode (the LIVE button, top-left): it switches to a zero-latency engine, so you can leave Kiyome on while recording instead of bypassing it.
Can I use it on a mix bus? +
Yes. For mix bus use, switch to M/S mode and use a gentle Depth setting (20–30%). Select the “Full Mix” instrument model. The “Mastering Touch” preset is a great starting point. M/S mode lets you de-mud the center of the mix without affecting stereo width.
What does Learn actually do? +
Learn mode analyzes the spectral energy distribution of your audio over 5 seconds. It identifies which frequency bands have the most energy buildup and automatically adjusts each band's sensitivity to target those areas more aggressively. Bands where the signal is clean receive lower sensitivity. The result is de-mudding that is tailored to your specific material.
Does the AI run on my GPU? +
No. Kiyome uses a lightweight ONNX neural network that runs entirely on the CPU. No GPU, no internet connection, and no cloud processing required. All AI inference happens locally on your machine in real time.
Can I automate parameters? +
Yes. All parameters (Depth, Speed, Tone, Output, instrument selection, band sensitivities, Analog Color amounts, and processing mode) are fully DAW-automatable via the standard AU/VST3/AAX parameter interface.
What is the difference between Speed and Tone? +
Speed controls the reaction time of the spectral detection — how quickly the AI responds to changes in the signal. Tone is a separate tilt shelf at 1 kHz applied after the AI de-mudding stage — turn left for a darker output, right for brighter, centre (50%) for a true bypass through Tone. Speed shapes time; Tone shapes overall tonal balance.
Is it safe for mastering? +
Yes. Use the “Mastering Touch” preset as a starting point. Keep Depth low (15–25%), use M/S mode, and always verify with Delta Listen that you are only removing mud, not musical content. Since v1.0.5, the linear-phase FIR engine preserves phase exactly across the de-mudding range — ideal for the precision demands of mastering.
What happens when the trial expires? +
When the 30-day trial expires, the plugin's audio output is muted. The interface remains functional so you can still browse presets and see the controls, but no audio will pass through until you purchase and activate a license.
14. Troubleshooting
Plugin Not Showing in DAW
-
1
Check Plugin Folders
Verify that
Kiyome.componentexists in~/Library/Audio/Plug-Ins/Components/andKiyome.vst3exists in~/Library/Audio/Plug-Ins/VST3/. -
2
Rescan Plugins
Trigger a plugin rescan in your DAW. In Logic Pro, restart the application. In Ableton, go to Preferences > Plug-ins > Rescan.
-
3
Refresh AU Cache
Open Terminal and run
killall -9 AudioComponentRegistrar, then restart your DAW. -
4
Reinstall
Download the latest installer from sugoiaudio.com and run it again.
No Processing Happening
- Check that the Depth knob is above 0%.
- Verify the Instrument selection matches your source material.
- Check that the Bypass button is off.
- Make sure no bands are individually bypassed (right-click nodes to check).
- Confirm the trial has not expired (expired trial mutes audio output).
UI Blank or White
- This is a macOS WebKit rendering issue. Restart your DAW.
- Verify your macOS version is 10.15 or later (Apple menu > About This Mac).
- Try loading the Standalone app to verify the UI works outside your DAW.
- Update macOS to the latest version — WebView rendering depends on the system-provided WebKit engine.
Learn Not Working
- Ensure audio is actively playing through the plugin during the Learn countdown.
- The signal must be audible — silence or extremely quiet signals will not produce a useful profile.
- If the button stays in countdown mode, wait for it to complete (5 seconds) or click to stop early.
High CPU Usage
- Switch to the Full Mix instrument model, which has lower complexity than specialized models.
- Increase your DAW's audio buffer size (e.g., from 128 to 256 or 512 samples).
- Close unused plugins and tracks in your session.
- The ONNX neural network runs on CPU — on older Intel Macs, you may see higher CPU usage than on Apple Silicon.
License Issues
- Check your internet connection — online activation requires a network connection.
- Ensure you are entering the license key exactly as provided (no extra spaces).
- If you are offline, use the offline activation method (Machine ID + offline token).
- If you have changed machines, contact support to transfer your license.
If the Issue Persists
Please contact our technical support team with the following information:
- Operating system version (e.g., macOS 14.2)
- DAW name and version
- Plugin format used (AU or VST3)
- Description of the problem and steps to reproduce it